Body seam

Steve's Classic Cars

New forum user
Messages
4
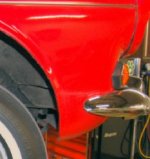
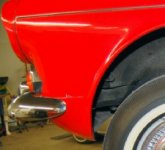
Does anyone have a close-up picture of the front corner of the tiger at the seam between the fender and the lower wrap around, specifically at the front edge of the wheel opening. Does the seam go all the way to the wheel lip or does it stop about an inch and is filled with weld or body filler???
 
The seam is filled at the rear where it joins the wheel arch, it is feathered at about the point where the guard turns the corner and is almost filled by the time it passes the deep part of the side indicator gasket... will try and get some pics.
 
seams

if you would like to see the step by step restoration of a body, go to my photobucket. http://s606.photobucket.com/albums/tt142/65beam/ photo #46 shows the seam and also #98 and #108. this restoration was done by a person that has worked on beams for the last 40 years. every aspect of the body restoration should be shown and the work is done correct. you also will find photos showing parts of the body removed along with other repairs to restore things like the front valance. farther on you will find some of my other cars. the midnight blue car was restored by him in 1995.
 
Can someone post a pic of the valance to fender seam showing the filling as I do not see how to search 65Beams pics?

My car is B9470536LRXFE so a MK1

The bodyman needs a pic rather than my explanation!
Thanks
 

Attachments

  • 824_p39_f~2.jpg
    824_p39_f~2.jpg
    15.8 KB · Views: 150
  • 824_p49_f~2.jpg
    824_p49_f~2.jpg
    16.9 KB · Views: 152
I feel silly asking this, but why did Roots only lead in part of the seam? Why leave a line? I understand the reason owners who want a stock look, try to get the seam just right, but why was it done in the first place? Same with the seam on the back fenders. When we were doing the body work on my MK1, the metal guy wanted to know what to do about the seam. I thought about it, and since my car is a modified Tiger, it didn't have to have the exposed seam, so we filled it in. Looks better that way, I think. Cliff
 
On early Alpines sI-II, the cars have round cornered panels on all edges ( leading and trailing) all sill, scuttle and boot seams are lead loaded. They feather the front and rear valence joints.

S3 alpine they leave the front sill joint exposed and square off the leading edge on the door. Also the seam through front indicator lens.

SIV they leave the seam on the rear guards below tail lights exposed. Same on the front indicator vertical panel joint once they change it to be mid light opening.

Mid SIV they sqaure the bonnet and rear door edge and leave the seams for sill joint at rear of the door and the acuttle exposed...

Basically they make panels square edge as there is less work for get panel gaps somewhat right for inaccurate pressings and then they leave seams exposed to save costs.

Also you will note they leave the rear seam on the rear scuttle leaded and often it will show stress cracks from flex between the joints as the body twists.
 
Back
Top