You are using an out of date browser. It may not display this or other websites correctly.
You should upgrade or use an alternative browser.
You should upgrade or use an alternative browser.
HardTop To Body Seal
- Thread starter KenF
- Start date
Long Leg on Outside
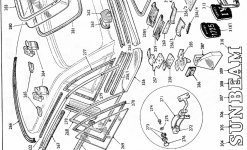
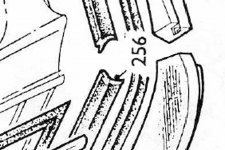
According to the parts diagram in the Rootes parts book for the Alpine, it appears that the long leg is towards the outside and the short leg is towards the inside. The first photo is a snapshot of part of Plate E - Section YX of that parts book. The second photo is a zoomed-in view showing the cross-section of the seal. I hope this helps.
According to the parts diagram in the Rootes parts book for the Alpine, it appears that the long leg is towards the outside and the short leg is towards the inside. The first photo is a snapshot of part of Plate E - Section YX of that parts book. The second photo is a zoomed-in view showing the cross-section of the seal. I hope this helps.
Attachments
KenF
Gold forum user
- Messages
- 397
According to the parts diagram in the Rootes parts book for the Alpine, it appears that the long leg is towards the outside and the short leg is towards the inside.
Thanks for that!
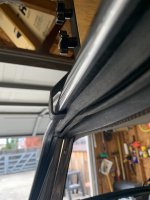
Just an observation on the hardtop to windshield piece (HT50) which fits into the channel and around the front edge of the top, I found it easier to fit the rear side of the channel first, then peel back the edge and jam the front edge into the channel. Plus you can see if rubber is really in the channel as its suppose to be. No glue or soap needed, but does take some patience. I tried doing edge and front of channel first, then rear, but that just wasn't happening. Just in case some frustrated soul searches for this in the future.....
Attachments

KenF
Gold forum user
- Messages
- 397
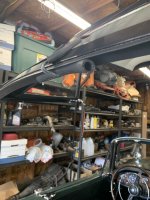
Hardtop Lift System
Spent my quarantine time building a lift system for the hardtop. Mounted a $80 electric hoist from Harbor Freight in the rafters. Built a roofline hugging felt lined wooden beam with metal brackets on the side to hook beneath the gutters, along with a strap to hook underneath the rear edge to stabilize.
I've got the rear window out to replace the seal. Still reading up on that, trying to decide if I should give it a shot, or hire an expert. Some DIY articles say trim and seal need to be installed as one, another says trim can be installed afterwards. Some suggest drilling a hole at the ends of the moulding and wire them together underneath the small center trim pieces.
And those rear pads are too thick! Even with the rear latch pin fitting adjusted all the way down, still too much. I'm guessing pads need to be trimmed.
Ken
Spent my quarantine time
building a lift system for the hardtop. Mounted a $80 electric hoist from Harbor Freight in the rafters. Built a roofline hugging felt lined wooden beam with metal brackets on the side to hook beneath the gutters, along with a strap to hook underneath the rear edge to stabilize.I've got the rear window out to replace the seal. Still reading up on that, trying to decide if I should give it a shot, or hire an expert. Some DIY articles say trim and seal need to be installed as one, another says trim can be installed afterwards. Some suggest drilling a hole at the ends of the moulding and wire them together underneath the small center trim pieces.
And those rear pads are too thick! Even with the rear latch pin fitting adjusted all the way down, still too much. I'm guessing pads need to be trimmed.
Ken
Attachments

- Messages
- 4,336
Yes the fat rear pads are an issue, trimming them is required. Whats the paint like on the body there the hardtop sits?
KenF
Gold forum user
- Messages
- 397
Yes the fat rear pads are an issue, trimming them is required. Whats the paint like on the body there the hardtop sits?
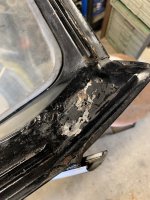
Pad areas looks quite well actually. I haven't buffed the paint out yet. The hardtop metal looked pretty good too, I prepped and POR-15'd a few spots and seams. I guess I'll get my cheese grater out and do some trimming.
. And those B pillar pads are like hard neoprene instead of rubber.Attachments


- Messages
- 4,336
Sunbeam specialities did sell a 3m film at one point cut to the profile of the hardtop to help protect the paint.