You are using an out of date browser. It may not display this or other websites correctly.
You should upgrade or use an alternative browser.
You should upgrade or use an alternative browser.
Radiator Shroud
- Thread starter steven
- Start date
- Messages
- 2,968
Measure twice
It's frozen and dark here at the moment, BUT, I can give you correct flange and hole measurements in our coming daylight. Do you have an after market shroud? Send a PM for pics.
At the top of the shroud their is a small flange that has 2 screw holes to attach to the body. Similar holes in the body. Is there a spacer between them ? the flange on the shroud is not longh enough to meet the body holes.
It's frozen and dark here at the moment, BUT, I can give you correct flange and hole measurements in our coming daylight. Do you have an after market shroud? Send a PM for pics.
- Messages
- 868
Steven, I can not swear that this is original- the car was last restored in the early 80's, but here's what I have- there is a u-shaped piece that sits under the shroud flange between the flange and the body, it bends 90 degrees at the back, makes another 90 degree bend and comes out under the body- it accepts a sheet metal screw. The photo shows the flange, the top of the u-shaped piece, and the top of the body. BTW- my flange does not fit flush on top of the body...

Small Flat Washers
While I am not the original owner of my Mk II, I have owned it since mid-1970. The shroud "flange" has two small diameter screws going though it with two or three (I can't remember off hand) small flat washers under the "flange".
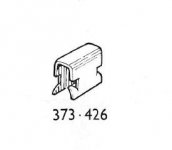
Having said this, I checked the Rootes Tiger 260 and 289 Parts Supplement Manual to see what it shows. It seems to call the shroud a "radiator cowl". In Section TF - Radiator has a diagram of the radiator and many parts, but does not show this "flange" or the two small screws or bolts which attach it to the body. However, in the list of parts, it refers to the following parts needed to attach the "radiator cowl" to the body:
2 Clip
2 Screw, #10 UNF x 3/4"
2 Rivnut
See the attached Snip of the appropriate section from the parts manual.
PS - I need to check my car in the morning. As I recall, there were a couple of clips on top of the shroud, clipping the upward part of the flange to another part of the shroud. Sorry I cannot be more exact, as I am working off my (poor) memory.
While I am not the original owner of my Mk II, I have owned it since mid-1970. The shroud "flange" has two small diameter screws going though it with two or three (I can't remember off hand) small flat washers under the "flange".
Having said this, I checked the Rootes Tiger 260 and 289 Parts Supplement Manual to see what it shows. It seems to call the shroud a "radiator cowl". In Section TF - Radiator has a diagram of the radiator and many parts, but does not show this "flange" or the two small screws or bolts which attach it to the body. However, in the list of parts, it refers to the following parts needed to attach the "radiator cowl" to the body:
2 Clip
2 Screw, #10 UNF x 3/4"
2 Rivnut
See the attached Snip of the appropriate section from the parts manual.
PS - I need to check my car in the morning. As I recall, there were a couple of clips on top of the shroud, clipping the upward part of the flange to another part of the shroud. Sorry I cannot be more exact, as I am working off my (poor) memory.
Attachments

Clip?
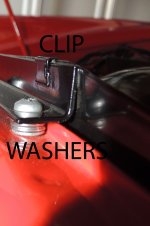
The photo shows the washers under the flange, with the machine screw going through them. It also shows some sort of clip on this flange with the other side on a vertical flange off the radiator shroud. I have no idea what is the purpose of this clip, since the flange (that is screwed to the body) is spot welded to the vertical flange off the radiator shroud.
I did check the body fittings section of the Sunbeam 260 and 289 Parts Supplement manual, and did not find the number of the clips (9130023) in the Body Fittings section. Nor did I find it in the Alpine Pars manual's Fasteners section. But in the Alpine parts book, I did find that part number in the Body Fittings section, page YX30. It is listed as Clip - Seal to bulkhead under Scuttle.
Photo 1 - Photo of Washers and Clip on my car
Photo 2 - Snip from Alpine Parts manual, showing clip listed on page YX30
Photo 3 - Snip from Alpine Parts manual, showing clip on Diagram G
I don't understand why there is a need for 2 clips in this location, since these clips normally hold a seal to the edge of some flange. Maybe someone else can say. If there was supposed to be a "seal" to protect mechanics from sharp edges on the flange, I would think it should also have been listed in the Tiger parts manual.
Attachments

- Messages
- 2,968
What Works
I think you are seeing the progression of stuff made to work over the decades.
The originals were very simple; The 10-32 machine screws went thru the upper shroud flange and into the rivet nuts on the recessed portion of the cowl.
Any other mounting is from historical intervention of some kind OR mis-made parts.
Last edited:
- Messages
- 868
Z clip?
If you are asking about the clip in the photo I took, picture a U shaped clip(on it's side) . The screw first passes through the fan shroud flange (not screwing into it- just passing through). The screw then passes through the top layer of the U- shaped clip. Next the screw passes through the body (still not screwing in). The body is sandwiched between the U shaped clip. Finally the screw threads into the bottom layer of the U-shaped clip, tightening and holding the whole thing together.
If you are asking about the clip in the photo I took, picture a U shaped clip(on it's side) . The screw first passes through the fan shroud flange (not screwing into it- just passing through). The screw then passes through the top layer of the U- shaped clip. Next the screw passes through the body (still not screwing in). The body is sandwiched between the U shaped clip. Finally the screw threads into the bottom layer of the U-shaped clip, tightening and holding the whole thing together.
Washers Probably Not Original
After thinking for some time about what the parts manual shows, I am convinced that the washers are not original. The parts manual makes it very clear that the two machine screws that go through the shroud flange go into rivnuts. But it does not appear that there was anything under the shroud flange and that as the screws tightened down, the flange would bend down somewhat. It appears that over the years, different owners have come up with their own ways of dealing with something that does not look right.
After thinking for some time about what the parts manual shows, I am convinced that the washers are not original. The parts manual makes it very clear that the two machine screws that go through the shroud flange go into rivnuts. But it does not appear that there was anything under the shroud flange and that as the screws tightened down, the flange would bend down somewhat. It appears that over the years, different owners have come up with their own ways of dealing with something that does not look right.
- Messages
- 4,325
Steven, iirc your car had been smacked in the front and repaired before the bigger hit as all the lettering on the front had been removed and holes filled in.. Might explain the misalignment