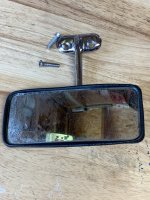
Small Convex Inside Mirror

KenF

Gold forum user
Messages
397
Anyone have any success removing the glass from the early small convex inside mirror? I'd like to get it resilvered but don't want to muck it up if it can't be done. Looks to have a vinyl wrapped edge, but is glass glued at the back also?

Thanks, Ken
 

Attachments

  • IMG_5135.JPG
    IMG_5135.JPG
    291.1 KB · Views: 83
Ken

I have done it twice. I used very small, thin screw driver without any mishaps. You must be gentle. Thinking back on it now, I might have been better using the plastic tools used to remove plastic trim if you can find one small enough.

I first pushed back the frame from the edges of the glass and then carefully worked the tool further underneath. One popped right off. The other was glued on the back and required additional prying.

The biggest fear is breaking the glass. I would not worry about scratching the silver because it will be resilvered any way.

Where are you located? I found a guy up in Long Island, NY who resilvered mine for $40 each.
 
Ken
Where are you located? I found a guy up in Long Island, NY who resilvered mine for $40 each.

I'm in Central NewsomVille, CA, but 40 bucks sounds like a heck of a deal!
Do you thinking a little soak in hot water would help soften up the plastic? But then you'd likely have to re-glue the vinyl covering.
 
Convex

Those cheaper Chrysler cars don't have the convex mirror. It's on my list to do as well. The Sunbeam one is easier my one 2 year V dub is metal cased arrrgh.
 
The mirror is secured with double sided tape to the base.

A fee words of caution... The moduled plastic the mirror sists in gets very brittle and as far as i know there are no replacements.. So be very careful how much pressure you use on it.

I have an article when a friend and i rebuilt one.. Happy to send it on.
 
I am curious about this too.. I used the google and came across a video that references a DIY kit. Might be useful...

-Kevin

https://www.youtube.com/watch?v=UtBtGK9hxdo

Found a more detailed video from same company that provides the mirroring chemicals in above video. Doesn’t look too hard to do, and kit would do several mirrors.

https://www.youtube.com/watch?v=xJOpSKbni3Y

The mirror is secured with double sided tape to the base.

A fee words of caution... The moduled plastic the mirror sists in gets very brittle and as far as i know there are no replacements.. So be very careful how much pressure you use on it.

I have an article when a friend and i rebuilt one.. Happy to send it on.

I'd definately be interested in that article, thanks. I'll report back if I build up the nerve to proceed. Likely send mount out to get re-chromed while apart.

Ken
 
Ken

This is the guy I used

http://www.waltersmirror.com/

I checked my invoice and it was $45 each...but he charged $25 for shipping from NY to VA. It was packaged very well but I thought that was a little steep.

Good Luck with the project.
 
Pass It Off

Being darned good at lazy, I just hand them off to our local glass & mirror guys. They come back all done without a bit of self struggle. No clue how they do it.
 
Disassembly

Well, I'm committed now! May as well show details, hopefully it will end well.

I soaked it in mineral spirits for awhile to loosen adhesive a bit.

Probed around the edge to figure out where adhesive was then pried/cut through the glue. Carefully pulled mirror and edge material away. Mirror was held to vinyl edging piece with what looks like double sided masking tape, which I separated. Then drilled out the two copper rivets.

Next steps are to get glass re-mirrored, or order the mirroring kit. Send the mount off to get re-chromed, and find a couple correct looking rivets. The vinyl edge piece has a split at one of the corners, need to decide if it needs replacing or try to salvage it.
 

Attachments

  • IMG_5142.JPG
    IMG_5142.JPG
    352 KB · Views: 112
  • IMG_5143.JPG
    IMG_5143.JPG
    255.4 KB · Views: 112
  • IMG_5145.JPG
    IMG_5145.JPG
    304.4 KB · Views: 113
  • IMG_5147.JPG
    IMG_5147.JPG
    486.9 KB · Views: 116
Reassembly

I bought a mount that was just rechromed from Bryan, who also loaned me his handy Tatco rivet squeezer he had from his aircraft days. I don't think I would have been able to find a way to use my press, or any of my other tools to set these rivets in place. I suppose you could use pop rivets if you aren't concerned about original appearance.

Ended up using a 3/16" long rivet on the hole end, and a 1/4" long rivet on the slot end. In hindsight you only need to drill out one of the rivets, but then the new rivet head may not match the old one in appearance. And you could pry the mirror off of the backing, leaving the outside edge alone, and cut the material to get access to the rivets.
 

Attachments

  • IMG_5151.JPG
    IMG_5151.JPG
    256.8 KB · Views: 137
Resilvering Mirrors

Received the 
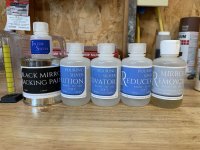
Mini Silver Kit from Angel Gilding today.
IMG_5176.jpg

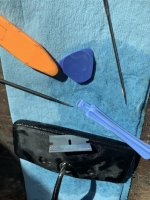
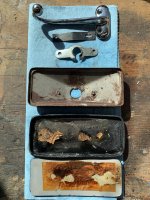
First job is remove any adhesive and paint from the back of the mirror. I used some Aircraft paint stripper after testing to make sure it didn't mess up the glass. Avoid using anything like metal blades that can scratch the glass.
IMG_5177.JPG

Then used the mirror remover (nitric acid) to get the old silvering off, which had a copper color to it. I just used the brush to work it in and remove without any scraping, even for the aircraft paint remover.
IMG_5181.JPG

Used the cleaning powder to clean the both sides until they're squeaky clean. I think that cleaner will also work great for removing water spots from glass, but haven't tried that yet.
IMG_5178.JPG

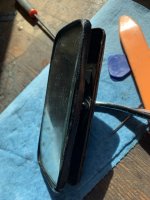
Basically followed their video instructions exactly, hasn't hard at all. The key is the cleaning and rinsing. If I do it again I may dry the glass after cleaning to make sure it really is clean, then rinse again. I went 10 minutes in the silver bath instead of 5 to get a bit extra thickness of silver. I did apply vinyl to the front side so I could avoid having to clean the mirroring off.

Here's the back side drying, which doesn't look so good, right?. But from the front side it looks great.
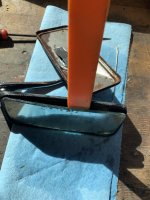
I'll post pics tomorrow after I add the paint to the backside and clean them up.
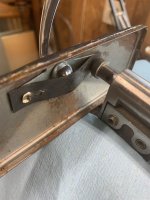
Also did one of Bryan's mirrors while I was at it. I filed a small notch on the edge of mine so I could tell which was which.
IMG_5182.JPG
 
Done

Painted the backside, and a little over the edges to help prevent moisture creeping under the silver at the edges. I used double-side tape to attach mirror to the plastic frame, then Weldwood contact cement around the edges to glue onto the mirror base.
IMG_5187.jpg

The other side. Decided to live with the cracked corner for now.
IMG_5190.jpg

Here's the mirror side on both, not perfect, but okay.
IMG_5193.jpg
 
Mini Mirror Silvering Kit

I bought the Mini Silvering kit from Angel Gilding a few weeks ago. I'm done with it, and the Tin For Silver chemical has a shelf life of 6 months, until 9/2020. I'd hate to see it sit there and rot away, there's probably enough to do 6-8 more mirrors.

If any other member wants to use it, I'll be happy to box it up and send it to any U.S. address. The only catch is you'd have to agree to send it onto the next person who wants to use it after a few weeks, or until gone. We could use this thread to make the routing list.

Anyway, thought I'd throw it out there if anyone is interested. If not, that's fine too.

Ken
 

Attachments

  • IMG_5305.JPG
    IMG_5305.JPG
    299.1 KB · Views: 78
Generous Offer

Ken,

That is a very generous offer. My mirror does not need resilvering, otherwise I would be taking you up on that. Hopefully there are folks out there whose mirrors do need resilvering and they take you up on your offer. As you said, it would be a shame for the chemicals to go bad with age.
 
I'm in

On this when things are more normal .
I got some things to ship as well.
I was looking at stamps.com but it says just hand it to your postal carrier.
My postal carrier can show up anytime between 3:00 p.m. and 10:00 p.m.
So that's pretty problematic.
I suppose they're going to add something to the list of boilerplate questions they ask you whenever you drop something off at the post office.
 
re-silver kit

I've been looking through a fuzzy mirror and would be interested in the kit. I would be very glad to send it along after my use. Small mirrors need a bit of work.
 
Next

I've been looking through a fuzzy mirror and would be interested in the kit. I would be very glad to send it along after my use. Small mirrors need a bit of work.

Dan, PM sent for address. Dan says he'll forward it onto next person...
 
Mirror Re-silver kit

Ok gang, I have done the mirror for my Tiger. Sadly, I broke the glass when re-installing it into the frame. That last push is always the one that hurts. Anyway, I am ready to pass the kit along to the next user. If anybody is interested, let me know and I will pass it along.
 
Back
Top