C.A.T. Stainless Headers

Tweak

Silver forum user
CAT Member
Messages
64
Doesn’t the provide a pic or it didn’t happen apply here?

Show us the headers!

Please.
 

spmdr

Gold forum user
CAT Member
Messages
367
Something like this?

A snap of the collection.
 

Attachments

  • P1090130.JPG
    P1090130.JPG
    3.8 MB · Views: 333

fluorescent7

Bronze forum user
CAT Member
Messages
5
New SS headers.

Got mine and they look fantastic! Flanges smooth and straight. Now to check the fit.
 

spmdr

Gold forum user
CAT Member
Messages
367
Speak up

I want to encourage those receiving headers from this new (3-19) batch of headers to give us feedback on the fit.

CAT is looking at ordering another batch and we want to address any issues that we may have over looked...

...Or more to the point, issues that crop up with different cars.

There are a lot of variables that effect fit and we have a small sample that we used to check fit.

So, put them on the cars. Then....

Speak up. Thanks! DW
 

at the beach

Gold forum user
CAT Member
Messages
907
I'd like to "second" Dan's comments.


CAT is always trying to make every batch of headers a little better than the last. But we can only fix problems we know about. We're test fitting each batch into a "perfect" car so we have confidence in what we send out.


However we can't predict how some cars have been treated in the last half century so if you find a problem please share it with Dan.


We urge all purchasers to check the fit of their headers promptly. Many years ago a problem was reported and we promptly fixed it. However the purchaser reported the problem years after his purchase. Like many of us, he just hadn't got around to checking the fit.


As I've mentioned in the past, this is a club - not a business. The more involved the membership is, the better the quality of our products. We're trying to make the best fitting headers available and we'll gladly receive input on how to make them fit even better.


Dan referred to the last batch of headers (from March). Those are now sold (there might be a set or two left). We need to order and build another batch immediately so now is a great time to speak up if you have any improvement ideas.


Finally, I'd like to thank Dan and Gary Hanks for the awesome job they've done to improve CAT's quality control in this header project. We owe a big debt to both of them!


Buck Trippel
CAT President
 

pappentl

Silver forum user
CAT Member
Messages
83
headers

Since you asked about installation of the new CAT SS headers:

Installation wasn't too bad, do the driver's side first then the passenger side will seem like a piece of cake. On both sides I removed both parts of the motor mount.

The passenger side fits well, no clearance issues.

The driver's side 2nd pipe hits the metal motor mount. I assume it would be better to grind down the mount verses dinging the down tube? What do you suggest as the minimum clearance?

Tom
B9473100
 

at the beach

Gold forum user
CAT Member
Messages
907
I would really have to see your car to give an informed recommendation but grinding on the edge of a motor mount is a pretty simple fix and certainly doesn't hurt much. (I'm assuming by "motor mount" you really mean grinding on the protruding corner of the motor mount and not on the cast iron motor hanger.)

However dimpling the tube (may not be real easy with stainless without help from a torch) should only effect performance at the highest rpms of big motors. I doubt anyone would notice a change in performance from a dimple if they were running a 289 redlining at 5,500.

Buck
 

pappentl

Silver forum user
CAT Member
Messages
83
Buck, thanks for the reply. It's actually hitting the cast iron hanger, not the rubber mount. A picture is attached although it's hard to see that the number 2 downtube is actually in contact with the metal motor hanger. I can grind a bit away w/o impacting the threaded portion.

The engine is original, the rubber mounts are SS and new. CAT header with stock manifold gasket.

Tom
B9473100
 

Attachments

  • CAT header vs mount.jpg
    CAT header vs mount.jpg
    3.5 MB · Views: 253

at the beach

Gold forum user
CAT Member
Messages
907
If it were my car I'd dimple the tube.

It's hard to tell from the picture but you might get away with raising the engine a smidge by inserting a washer on each bolt between the mount and the engine.

Buck.
 

Tweak

Silver forum user
CAT Member
Messages
64
I have the previous CAT header and faced similar issues. I opted for hammer persuasion of the headers in every case. Then I had the clearances headers ceramics coated. No regrets.

Some day I am going to determine if my aftermarket aluminum heads caused the multiple issues I had. The engine builder says no, but I’m skeptical.
 

norm1

Gold forum user
CAT Member
Messages
283
I have the previous CAT header and faced similar issues. I opted for hammer persuasion of the headers in every case. Then I had the clearances headers ceramics coated. No regrets.

Some day I am going to determine if my aftermarket aluminum heads caused the multiple issues I had. The engine builder says no, but I’m skeptical.


No, I had the same problems with a stock HIPO 289. Grounfd motor mounts and dimpled headers to get 1/8"+ clearances....

Be sure to check the ports for over grinding of the ports which could cause exhaust leaks pat the gasket....I had to do some rewelding ....
 

Michael

Bronze forum user
CAT Member
Messages
15
Finally managed to get the time to install my new CAT Headers. Nearly fit but I did have to grind down the motor mounts slightly on both sides. For anyone else doing It I suggest you prepare for this because you get really, really close to finished before finding out it really doesn't fit and having to pull everything back out again.

Oddly on mine the much easier looking passenger side was the hard one and the cluttered driver side went better. My biggest issue was the exhaust pipe was in the way. Awkward to cut an exhaust off lying on a creeper under the car. I now have new plugs in, headers on but no exhaust. Neighbors will be pleased when I try to heat cycle and re-tighten the headers, I'm sure.
 

spmdr

Gold forum user
CAT Member
Messages
367
Fitting Tube headers can be a BITCH!

...at least the FIRST time.

...especially with a TIGER!

Usually, the first challenge is the Motor mounts, they are NEARLY Identical.

But they ARE different, right to left.

And THEN, the FACT is, not ALL motor mounts are the SAME, Brand to Brand, AND sometime, Batch to Batch!

And they don't live forever.


The second challenge is, Not all Tigers are the same!

Some have lived a HARD life!

...And some a HARDER Life!

And then there are the ones that have been Killed and brought back to life, ...multiple times.

...All bets are OFF with a Whacked Tiger.

Even the "perfect" Tigers very from one to the other.


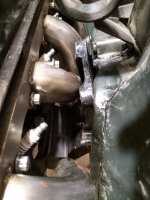
The Third challenge is motor position.

Years ago I talked to a Tiger owner who said he HAD to "Massage" the Left side header for clearance.

I looked at the Left side and he was correct, there was very little clearance AFTER the Massaging.

I walked around to the Right side only to see an EXCESSIVE amount of Clearance.

Clearly there was a problem with Motor Position, the headers were NOT the problem!


When fitting Headers, be prepared to MOVE the engine around, front to back and side to side!

CAT headers (ca. 1994-2010 ish, old fixtures) had a "SWEET spot" (position) you HAD to get to.

That Sweet spot was quite small, but it WAS there! Most of the time you had to FIND IT!

Sometime you were lucky and it found it's self.

Sometime, to get to that sweet spot required opening the holes in the motor mount, to the engine block.

Sometime the motor mounts NEED changing and/or more drastic mods.

I consider motor mounts the first and primary subjects for modification when fitting headers.

Note, motor mount HANGERS (the cast all metal parts) are Tiger ONLY parts and should be treated accordingly.


With the recent change in the header fixtures, we have attempted to make a BIGGER Sweet spot!

BUT, it is STILL there and most likely will never go away.

We are currently (12-19) working on the Fixtures (again) trying to make the sweet spot ALMOST go away (Santa now knows our Xmas list).
 
Last edited:

HolyCat

Gold forum user
CAT Member
Messages
1,243
Great Info

Dan,

Thank you for taking the time to write out all this great information as well as all your work to improve the stainless steel headers. I hope the readers understand how much time and effort this takes!

Thanks!
 

0neoffive

Gold forum user
CAT Member
Messages
2,862
Them Headers

Clients always ask for a labor quote on headers. Ain't ever gonna happen !! I've also had a few where the collectors were not aimed at the cruciform holes worth a darn. 9# short splitting maul comes to work often . . .
 
Top