Hardtop Disassembly

VaCat33

Gold forum user
CAT Member
Messages
524
Hi All and Happy New Year

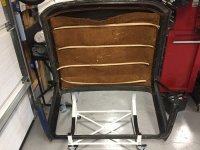
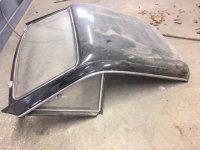
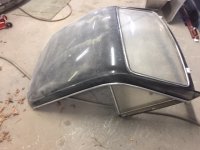
Last year I found a hardtop which will need restoration, but it is solid and has all the hardware and shiny bits. I thought I would disassemble it as a winter project, in preparation for sending it out for paint in the spring. I have yet to decide whether I go with body color or black. (My car is carnival red.) If I do go with black does anybody know the modern paint color/code to match the original black color.

I have my parts manual with the schematic of how the hardtop comes apart, but that is my total knowledge base. Are there any guides or instructions out there? How about secrets, things to watch out for and tips for making the project easier.

Thanks
 

Attachments

  • Hardtop 1.JPG
    Hardtop 1.JPG
    101.4 KB · Views: 119
  • Hardtop 2.JPG
    Hardtop 2.JPG
    91 KB · Views: 116
Jim,

Id paint it black for 2 reasons...

1. Only body colour on GT Alpine ( and the few GT tigers) or if you specified it when ordering new, otherwise they are all black.

2. Matching the colour and having the top painted now and the less sun exposure it will have in use will mean you will likely have a missmatch of reds in the future.. And i know you show the car competitively...so black is a safer option for you.
 
Be careful removing the small screws holding the vent windows in place-they often break due to corrosion. The same problem when removing the B post side clamps and the rear locator pegs. Eric
 
Dittos

But I'd add time and lot's of Kroil, WD-40, Acetone and ATF, or your favorite to battle the cheap plated steel screws put into pot metal or into any steel of the top and perhaps some heat.

If you could take some pictures of the headliner rods and note their shapes and positions from front to back cause many people "myself included," mix them up and it becomes a guessing game later what went where.

I thought I read someplace a method for re installing the gutter bright work, they are a PITA to remove and I bet install, be interested to hear about that as I have a painted top hanging. Be really interested to see your progress as I have a black one in process and a white one waiting.

White was also an option as well and it's a very high visibility and is nice on a 39 car. Then there is the Black vs White paint discussion with the black cars stay clean for like 10 minutes:) Also add a black roof in the sun is great in Winter and bad when in the sun too long. I have read some discussions about upgrading the Jute padding/insulation to a more practical and modern type. As a mental side bar as I typing I'm thinking of the guy selling the original Jute from a car on ePay for 90 bucks, I guess if you like the smell of originality ....

I have a ledger page that states the color of my car and HT that was ordered with the car in code 1. My other car has no info suggesting the top was added at a later date.

Hope that you find no rust under the corner pads... Wonder what the designers were thinking when they located the C pillar drain holes underneath the pads and the metal hold down....
 
...snip .... I have a ledger page that states the color of my car and HT that was ordered with the car in code 1. My other car has no info suggesting the top was added at a later date. ...snip...[/QUOTE said:
Be great to see an image of that "ledger page". From everything I've heard, actual colour code was never listed.

J.D.
 
Special order

It also says HT and since it was special order, that's why it was listed. I can't post pics. All the other pages I have don't have colors, but that's just a few. Not to go further O/T but it was just a fun fact to discuss. I'd also be interested in seeing a Embassy Black or w/e black the top was originally.
 
It also says HT and since it was special order, that's why it was listed. I can't post pics. All the other pages I have don't have colors, but that's just a few. Not to go further O/T but it was just a fun fact to discuss. I'd also be interested in seeing a Embassy Black or w/e black the top was originally.

Where are you getting the "special order" information? Do you have original dealer paperwork showing that?

J.D.
 
Word of

Mouth old wife's tale etc. I don't remember where I picked up that information. I was just looking at one page and it has nearly the entire one filled with green cars listed. When I find mine and edit away the rest of the page I'll show you mine off line. Think we can only guess on why some have the colors on the pages. I don't suppose you can actually tell that a hard top came with a car or not otherwise or that one is original to the car, but with the 5 or 6 , I had only a couple had a number stamping. There was a key also in the beginning showing HT as hard top.Got too many pictures saved over several devices.
 
Mission Complete

Yesterday, with the help of DC Tiger, I disassembled my hardtop. I am very glad to report it was pretty painless and took about three hours.

All the fasteners came out without to much hassle, although a few put up a fight but succumbed to penetrating oil. This hard top had seen a previous restoration at some point in its life so the fasteners were not in place for a full fifty years. The only real tedious part was getting the rain gutter trim off. Took about an hour for that part alone, but got it done with no damage to the trim.

No rust anywhere, other than some superficial surface stuff.

Original headliner rods in place and I left them there for the time being.

Now it is time to send out the chrome bits for Re-chroming and to polish up the aluminum trim.

Going with black once I send it out for paint. Asking once again if anybody knows correct shade of black and modern color code.

Thanks
 

Attachments

  • 49111181-D338-490B-B8A5-27737C0ED9CD.jpeg
    49111181-D338-490B-B8A5-27737C0ED9CD.jpeg
    2 MB · Views: 181
Thanks for posting this. I have my original hardtop but unfortunately a restorer removed the headliner and lost the rods. Now at least with the picture I know what I'm missing. If anyone knows of a spare set of rods I'd be keen to know.

My top did match the original (white) body color, btw
 
Look em up

A. Washick in Florida in the roster
AKA Ryal064 I believe. He's a two Tiger owner and also does bands for the expansion tank , and the small rubber parts on the seat adjuster etc.
 
Corner pad

I have what I believe to be a late top and an early top. Both have the annoying channel that is under the corner pad. Rick at S.S. says the channel is specific to one of the tops and is not needed. Question is why is it there and how did it effect the fitment with it there? Was it to allow some weeping area for the misplaced drain hole?
 

Attachments

  • IMG_20190701_081310.jpg
    IMG_20190701_081310.jpg
    2.7 MB · Views: 136
Small bolt extractor or...?

Be careful removing the small screws holding the vent windows in place-they often break due to corrosion. The same problem when removing the B post side clamps and the rear locator pegs. Eric

I had the vent screw shear as warned here. This was couple years back prior to mediablast, primer and repaint. So, likely corrosion AND binding paints at screw thread.

So now that im prepping to reassemble, whats the known good process for removal? I attempted to vice clamp, but it wont turn. I tried to locally add pb blaster to threads, but i also need to paint interior and dont want that lubricant on to be painted surfaces. A small extractor is worth a shot, but a quick amazon search did not reveal one.

Since a couple have gone through this, appreciate your suggestions.
 

Attachments

  • 2F0A47D3-F81C-44EE-9D8D-B705C982A06B.jpeg
    2F0A47D3-F81C-44EE-9D8D-B705C982A06B.jpeg
    77.4 KB · Views: 92
Weld onto Stud?

There are others with a lot more experience than what I have, but I have seen where folks have welded a nut to the stub sticking up and then use the nut to unscrew the stud. Of course, one would have to be very careful to avoid damage to the sheet steel of the hardtop while welding.

Good Luck!
 
Seems like a good idea...alas

There are others with a lot more experience than what I have, but I have seen where folks have welded a nut to the stub sticking up and then use the nut to unscrew the stud. Of course, one would have to be very careful to avoid damage to the sheet steel of the hardtop while welding.

Good Luck!

No welder here... Perhaps a super weld / plastiweld / loctite adhesive?

I was just thinking it would be "best" to have gription on as much of the remaining length of the bolt shaft as possible. Adding a new "head" may just shear there and make it shorter still. Those extractors have threads for some length...

Should probably try heat also (but again, trying to do w/o messing with the paint prepared area. Maybe a solder iron on the bolt... worth a shot...

Edit: so the brainstorming worked. Thanks HolyCat. Used pin tip with drops of PB blaster to finely drip near captured nut(s). Let sit. Then hit with point of solder iron for a bit. Some smoke. Could tell was melting some sprayed on paint at threads. Continued heating for a minute or two. Clamped on vice grips and gentle turn. Voila! Sometimes its the smallest victories... lol. Now in need of replacement screw(s).
 

Attachments

  • 42284EE7-F2F1-47B7-94C3-732B59DD6C9F.jpeg
    42284EE7-F2F1-47B7-94C3-732B59DD6C9F.jpeg
    96.3 KB · Views: 78
Last edited:
Back
Top